


If you buy Visio 2013, it is to create graphical representations using different models, practical symbols and tools provided with the visualization program designed by Microsoft. After you have gone through our brief introduction, you can already set up workflows, office plans and organizational charts. Have a good time!
Buy Visio 2013: Introduction to the visualization program
If you have downloaded Visio 2013 Professional, you will find in Microsoft’s visualization program various diagrams with network diagrams, workflows, flowcharts and office or family plans. However, the following three steps, on which Microsoft Visio 2013 is based, are common to all diagrams:
- Choose the model and open it
- Add a shape by sliding and connect
- Add text the form
Each integrated model has its own shapes. They are linked with types of drawings within collections. The types of drawings are called templates. In the Shapes window, you will find the templates next to the drawing sheet. This allows you to open, for example, with the Standard Flow Diagram template, the Shapes template of the Standard Flow Diagram.

If you want to create a diagram, now you just have to drag the shapes from the templates to the blank sheet. Then these will be connected. This is done through different means. In our example, we use the Automatic Login function. The „Start/end“ form of a flow diagram, for example, can be connected in a few clicks with a new „process“ form:
- Drag the Start/End shape of the Simple Flow Diagram Shapes template to the drawing page, then release the mouse button.
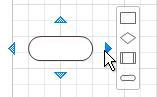
- Hold the mouse pointer over the shape until the blue Automatic Login arrows appear.

A mini toolbar containing the shapes of the template is displayed.
- Click on the square shape Process.
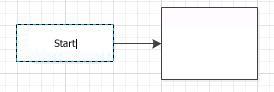
The Process form is added to the diagram and is automatically connected to the Start/End form.
If the shape you want to add is not in the mini toolbar, you can drag the shape you want from the Shapes window and drop it on a blue arrow. The new shape is connected to the first shape as if you had clicked on it in the mini toolbar.
Also use the Auto Connect arrows to connect two shapes already present in your drawing. Drag an Automatic Connection arrow from one shape and drop it on another. You get an arrow going from the first to the second shape.
Visualize your projects using Microsoft Visio 2013: Add text to shapes
To add text to the form, click on the form; you can then start typing the text. No need to double-click to add text to a shape. The text is added to the selected shape as you type.
Once you have finished typing your text, click on a blank area of the drawing page or press the Escape key, you can add text to almost any object by selecting it and typing.
Forms in Visio 2013
Visio shapes are ready-to-use objects that you drag onto your drawing page, they are basically building blocks for diagrams.
When you drag a shape from the shapes window to your drawing page, the original shape remains in the template. The original is called a basic form. The shape you place in your drawing is a copy, also called an instance – of this mask. You can draw as many instances of the same shape as you want.
- Rotation handles
The round handle above a selected shape is called a rotation handle. Slide a rotation handle to the right or left to rotate the shape.
- Connection arrows for Automatic connection
The connection arrows allow you to easily connect shapes to each other, as we have seen above.
- Selection handles for resizing shapes
You can use the square selection handles to change the height and width of your shape. Click on a selection handle in the corner of a shape and drag it to enlarge the shape without changing its proportions. You can also click on a selection handle on the side of the shape and drag it to enlarge or enlarge the shape.
You can change the width and height of the shapes by using the selection points in the square where the shape is inserted. To do this, click in the corner of a shape on a selection point. Stretch it to the desired size without changing the proportions of the shape. The edges of the shape have selection points to change the height and width of the shape.
Visio 2013 templates
Visio templates contain sets of shapes. The shapes in each template have something in common. Shapes can be a collection of shapes that you need to create a particular type of diagram. The same is true for creating different versions of the same shape. For example, the Simple Flow Diagram Shapes template contains only the current flow diagram shapes. More specialized forms of flowcharts are in other templates, such as Workflow Objects and TQM Diagram Forms.
The templates appear in the Shapes window, with the title bars grouped at the top of the window. To see the shapes of a particular template, click on its title bar.
The Visio 2013 models
When you want to create a diagram, start with a model for this type of diagram. Using templates that you need for a drawing type, you open the model.
The hierarchical organizational chart model includes distinct forms for managers, supervisors, assistants, posts, consultants, individual contractors, etc. The House Plan model, for example, opens with templates full of shapes such as cupboards, furniture, appliances, walls and so on.
Using the different models, their symbols and tools, it is quick and easy to create graphic visuals. The shapes in the templates can be connected with Excel tables or databases to create a diagram. Once your diagram is created, it is easy to integrate it into other documents by simply clicking and dragging, or to integrate it as a separate document (.vsd).
The differences between Visio 2013 and Visio 2016
Visio 2013 is the one elected for the debut. This Microsoft modelling program is particularly suitable for self-employed, self-employed, or home-based workers. The only significant differences are in team collaboration and dynamic diagrams with real-time dates, which is only important for large companies. Under Visio 2013, there is no need to quickly connect data with Excel tables and exchange data graphs with a single click. But this pill is not too bitter. Especially since, apart from that, Microsoft Visio 2013 finally contains all the important tools. For this reason, Visio 2013 would also be ideal for students.
At Licenceking, you have the opportunity to acquire Visio 2013 in a 100% secure and 100% legal way. Make sure you access your Visio 2013 license from the European leader in new and used software, and start viewing your projects today!


